Feature · Multi-Wheel

Every layer of time, on one wheel.

Astrolium's Multi-Wheel stacks natal, progressed, solar arc and transit rings on one wheel and flags natal points that two or more techniques hit at once.

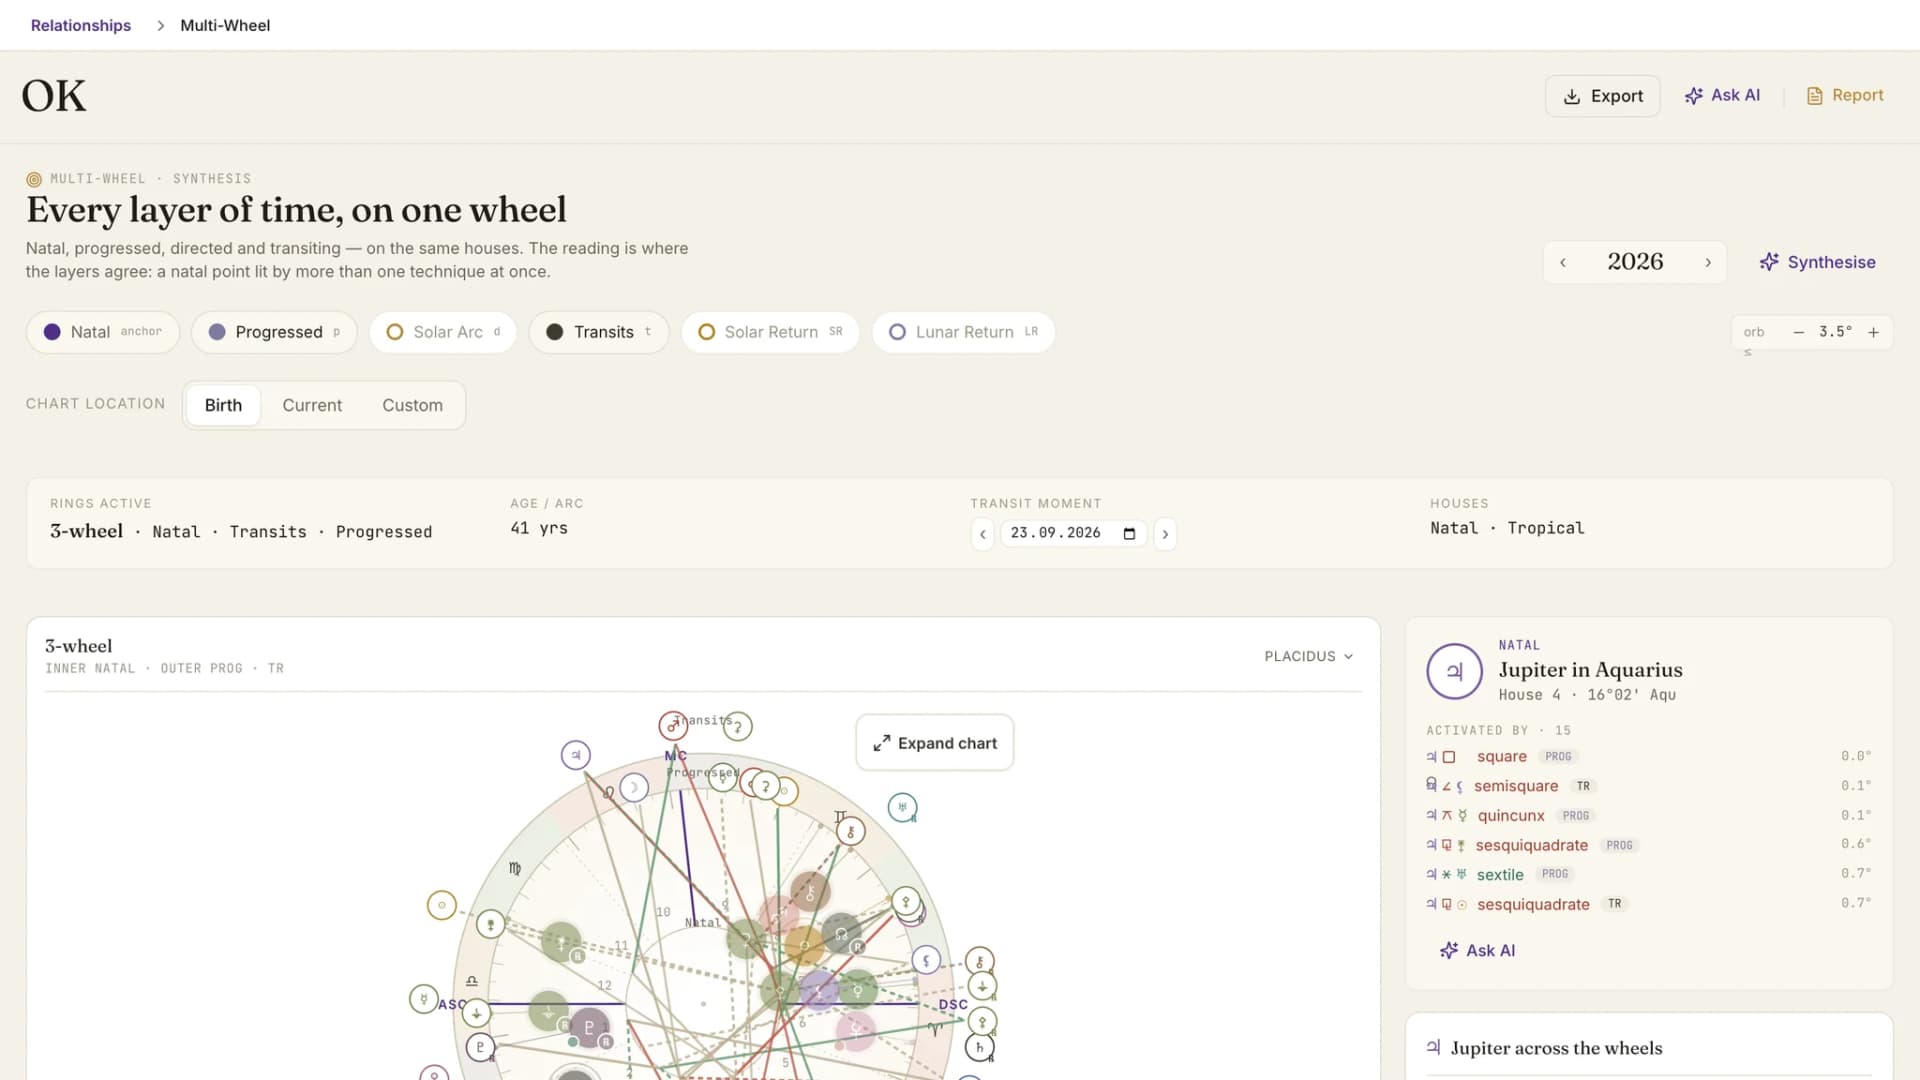
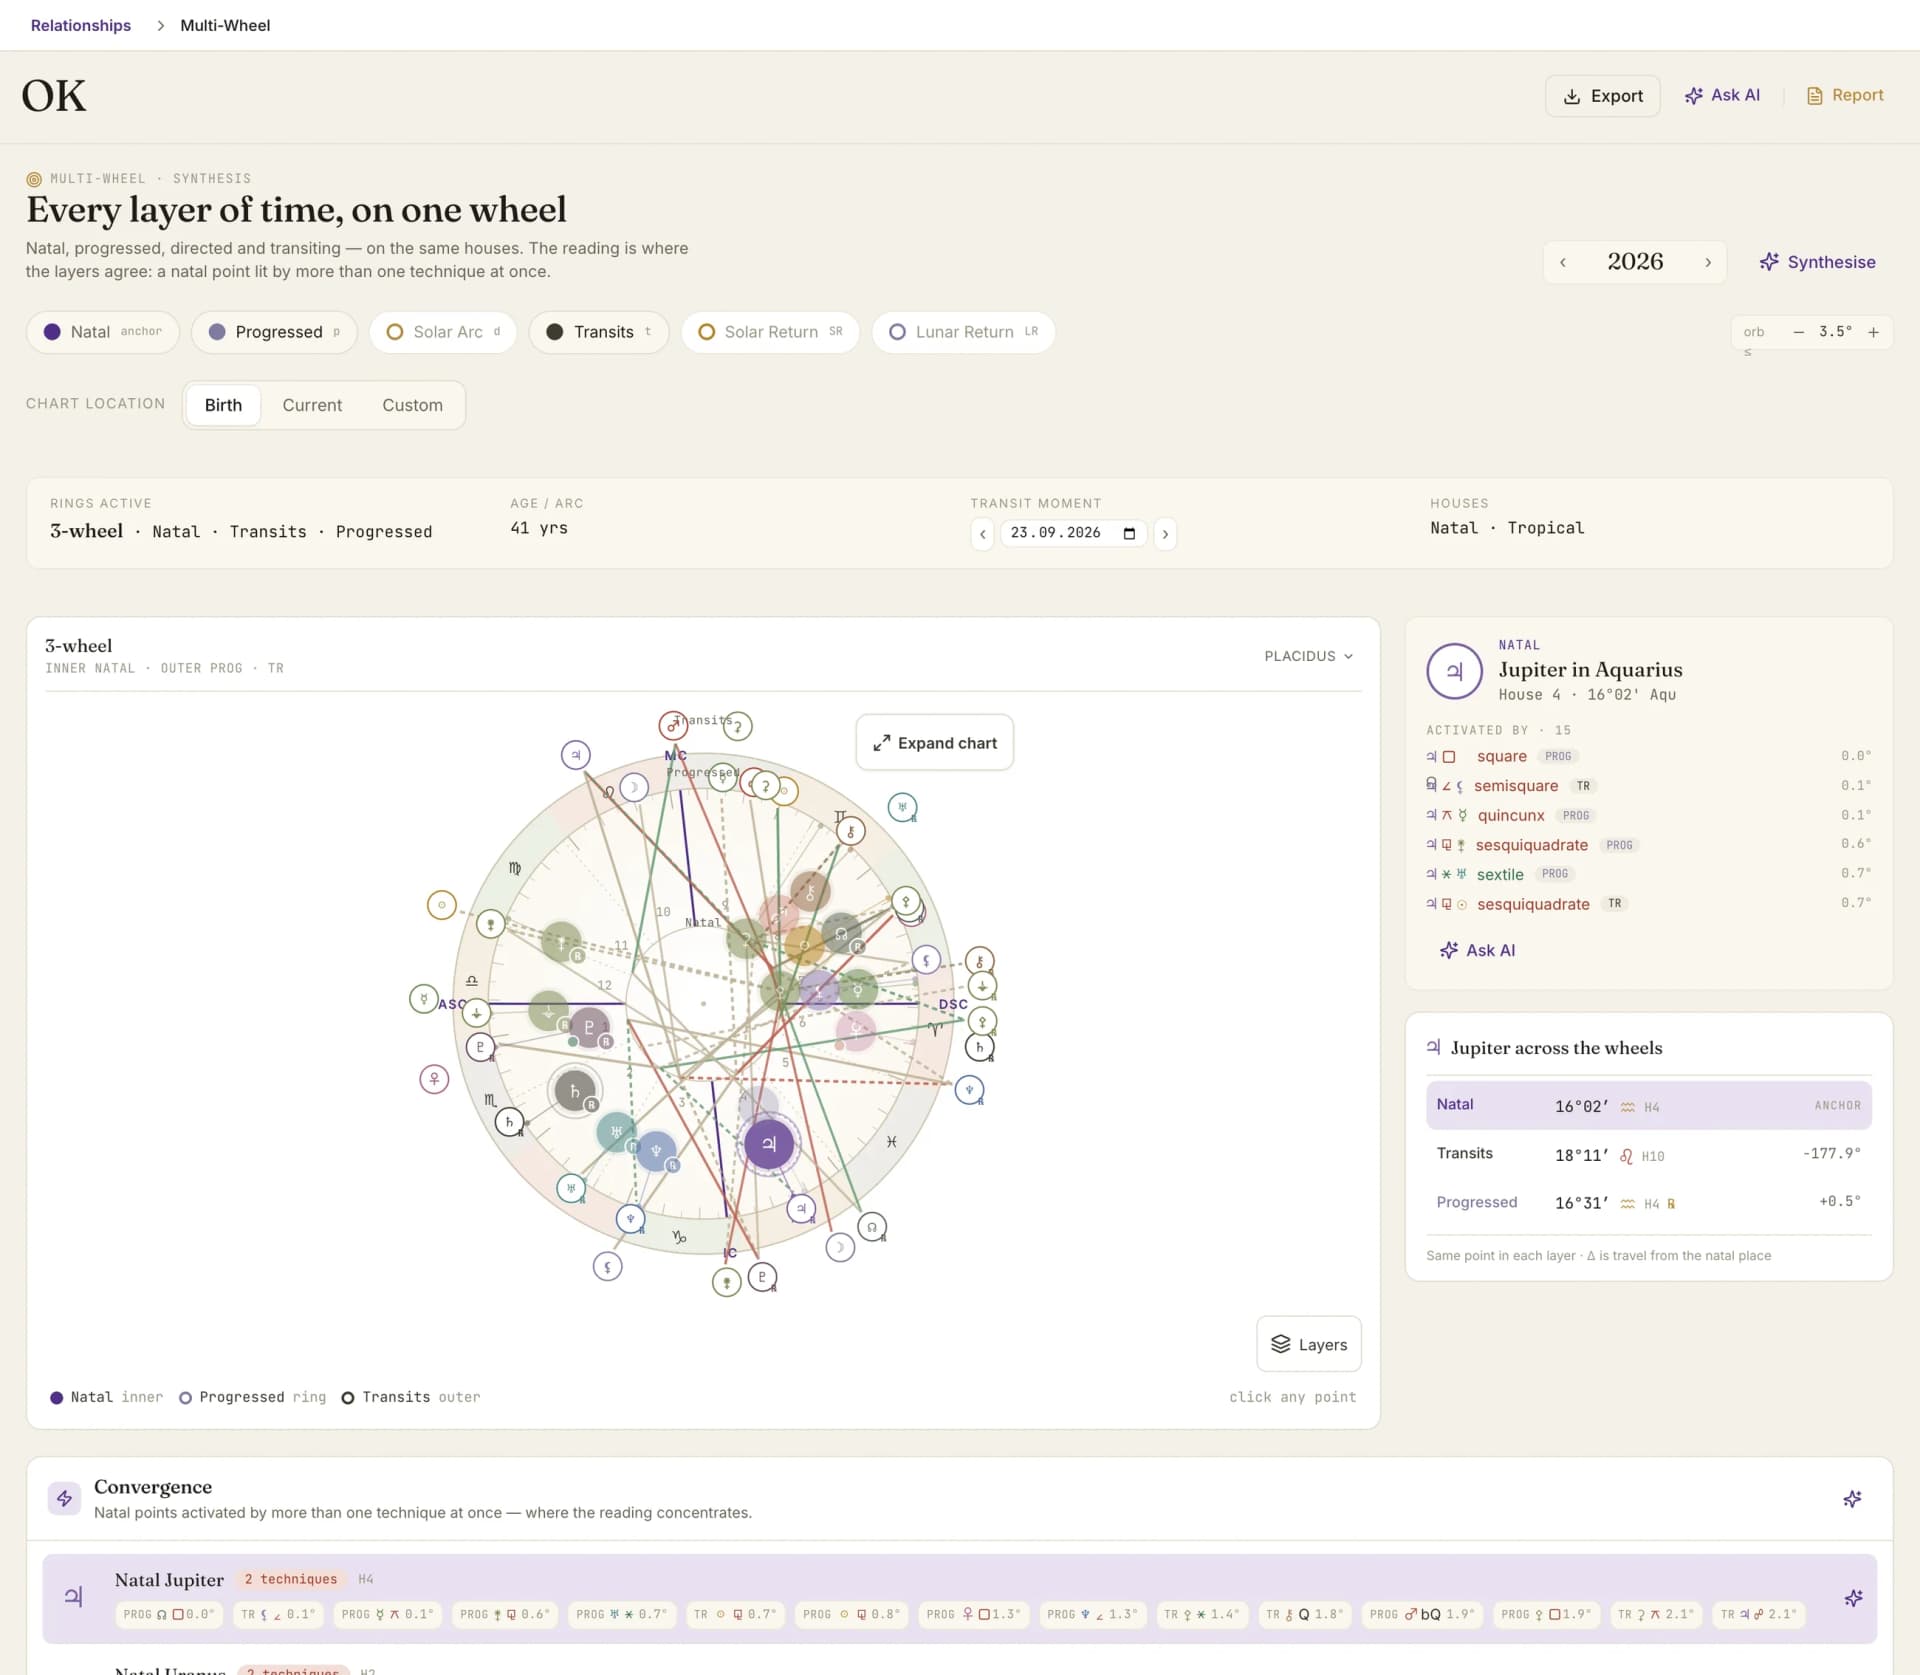
The multi-wheel: natal, progressed and transit layers on one interactive wheel with the active contacts

By Oleg Kopachovets · Updated September 23, 2026

01

Progressions, directions and transits usually open as three separate charts, so the moment where they agree has to be found by flipping between windows.

02

A tri-wheel that draws every aspect between every ring turns into a hairball, and outer-to-outer lines are not the contacts a timing reading is built on.

03

Most multi-wheels stop at drawing. Which natal point is under pressure from more than one technique is left for the astrologer to count by hand.

04

When a ring fails to calculate, some tools quietly draw a stale or estimated one in its place.

Capabilities

What you can do with our multi-wheel chart

Up to three outer rings

Natal is the anchor and always shown. Add Progressed, Solar Arc, Transits, Solar Return or Lunar Return, up to three at a time, all on the natal houses.

Convergence, computed

A Convergence panel lists natal points activated by at least two techniques at once, ranked by how many techniques agree and then by the tightest orb.

Cross-ring contacts table

The tightest 40 moving-ring aspects to the natal chart, with technique, moving point, aspect, natal point and orb. Filter to tense or harmonious contacts.

Aspect layers you can isolate

Each ring gets its own aspects layer and a to-natal layer. Show only Transits to natal, for example, without recalculating anything. No outer-to-outer layer is drawn.

Year and date controls

A year stepper drives the progressed and directed rings. A transit date field with month steps drives transits and the two return rings.

Relocate the frame

Birth, Current or Custom place recasts the natal angles and houses. Planet longitudes stay put, and return rings are cast at that place too.

How multi-wheel chart works in Astrolium

  1. Step 01 / 03

    Pick the rings

    Progressed and Transits are on when the module opens. Swap in Solar Arc or a return; once three outer rings are active, the rest wait until you turn one off.

  2. Step 02 / 03

    Set the moment

    Step the year for progressions and arcs, move the transit date by a month or type one in, and tighten or widen the orb ceiling in half-degree steps.

  3. Step 03 / 03

    Read where the layers agree

    Open the top convergence, click the natal point, and see the same body tracked across every ring, with Ask AI and links into Transits or Progressions.

In the app

The real multi-wheel chart screen, not a mockup

The multi-wheel: natal, progressed and transit layers on one interactive wheel with the active contacts

Astrolium's Multi-Wheel puts natal, progressed, solar arc and transit positions on the same houses and then answers the question a stack of rings raises: where do the techniques agree? It is included with the $11 per month Pro plan; see pricing.

Each ring has a dedicated module behind it. For transits on their own, see transits. For secondary progressions and arcs in depth, see progressions. The anchor for every ring is the natal chart.

What convergence synthesis means

Convergence synthesis is reading a period from the natal points that more than one predictive technique activates at once. Astrolium's Multi-Wheel builds it directly. Natal sits at the center as the anchor, and up to three outer rings stack around it: progressed, solar arc, transits, solar return or lunar return, all sharing the natal houses. Every moving ring is checked against the natal chart within your orb ceiling, from 1° to 8° and 3.5° by default. The Convergence panel then lists each natal point hit by two or more techniques, ranked by how many agree and then by the tightest orb. A cross-ring contacts table shows the tightest 40 aspects behind it. Aspect layers let you isolate one pairing, such as transits to natal, without recalculating. If a ring fails to calculate, the module marks it with a retry button and draws no substitute in its place.

One technique alone gives a lot of noise. A transiting outer planet squares something in most charts most of the year. A progressed Moon changes sign every two and a half years or so. The contacts that carry a period are usually the ones confirmed from two directions: a secondary progression and a transit landing on the same natal planet in the same window.

The module is built for finding those.

The ring stack

Natal is locked on. The outer rings follow a fixed order, techniques closest to the birth chart and the live sky outermost: progressed, solar arc, solar return, lunar return, transits. You toggle rings; you do not reorder them.

The cap is three outer rings. With three on, the remaining toggles are disabled and carry the reason. A four-ring view already asks a lot of the eye, and five would bury the natal chart it exists to read.

Progressed and Transits are on when the module opens. That pairing is the most common one in consultation work, and it is the smallest setup that can produce a convergence at all. With only one moving ring, the panel asks you to add a second.

A stamp bar across the top reports the current state: how many rings are active, the client's age and the arc in degrees with its direction type, the transit moment, and the zodiac the natal chart uses.

Convergence, then contacts

The Convergence panel is the first thing to read. Each entry names a natal point, its house, and the techniques hitting it, with the count shown as two techniques or three techniques. Ask AI on an entry sends that exact set of contacts and asks how to counsel around it.

Below it, the cross-ring contacts table carries the detail: technique, moving point, aspect, natal point, orb. It shows the tightest 40 and states the total. A tense or harmonious filter narrows the table and the chords on the wheel. Convergence stays on the full set, because it records what two techniques confirm, and a tone filter should not quietly remove a confirmation.

When nothing converges within the orb, the panel says so and suggests widening the orb, adding a ring or stepping the year or date.

Aspect layers

Drawing every aspect between every ring is how multi-wheels become unreadable. Astrolium splits them into named layers: natal aspects, each ring's own aspects, and each moving ring to natal. Progressed to transits is not a layer, since that pairing is not the contact a timing reading rests on.

Any layer can be shown alone. Show only Transits to natal, and the wheel and inspector drop everything else. The positions are already calculated, so switching layers does not trigger a new request.

Moving through time

Two controls, because the rings move on different clocks. The year stepper drives the progressed and solar arc rings, anchored at mid-year. The transit date drives transits and the two return rings, with previous and next month buttons either side of a date field. Moving the transit date into a new year moves the year stepper with it.

Click a point, follow it across the rings

Select any point on the wheel and a panel shows its sign, house and what activates it. A second table tracks the same body in each layer, with the travel from its natal place. From there, Open in Transits or Open in Progressions takes you into the full module for that technique with the same client.

Frame, houses and place

The house system can be overridden for this chart alone, from Placidus, Whole Sign, Equal from the Ascendant, Koch, Porphyry, Campanus, Regiomontanus and Topocentric, without touching your global settings.

Chart location offers Birth, Current or Custom. Choosing another place recasts the natal frame's angles and houses; planet longitudes do not change. So a transit to the relocated Ascendant shows up where it should. Solar and lunar return rings, when on, are cast at that place too.

Ask AI and reports

The Synthesise button asks Sky to weave the active rings into one timing narrative, using the strongest contacts and the top convergences. It waits until every selected ring is ready. Every point and contact in the wheel inspector also carries Ask AI, and those prompts name which technique each side belongs to so the layers are not blended into one voice. The prompts address the client by first name only. More on the assistant in AI assistant.

For a client deliverable, the reports menu opens Built-In Reports, a multi-page Astrolium-branded PDF, or Report Studio, where the Timing Synthesis template turns the multi-wheel into a seven-page report led by convergence.

Cross-link

For the progressed chart as a standalone calculation, try the progressed chart calculator. For the directed ring on its own, see solar arc directions. For the theory behind the inner ring, read the secondary progressions guide. For the return rings, see solar return and lunar return. For the scanner that dates transits ahead, see predictive timing.

Frequently asked questions

Which rings can I stack on the Multi-Wheel?
Natal is the anchor and cannot be switched off. Outside it you can add Progressed (secondary, day for a year), Solar Arc, Transits, Solar Return and Lunar Return. Up to three outer rings run at once; when three are on, the other toggles are disabled until you turn one off. Every ring sits on the natal houses, so a transit and a progression to the same natal point read in the same frame.
What counts as a convergence?
A natal point contacted by at least two different techniques at the same time, within the orb you set. Progressed Mars square natal Saturn plus transiting Pluto opposite natal Saturn makes natal Saturn a convergence. Results rank by the number of confirming techniques, then by the tightest orb. When progressed Sun is already present, the solar arc Sun contact to the same point is dropped, so one body is not counted twice. Convergence waits until every selected ring has finished calculating.
Why don't I see aspects between the progressed and transit rings?
The aspect layers pair each ring with itself and each moving ring with natal. Outer-to-outer layers are left out, because a timing reading is about what the moving techniques do to the birth chart. You can still show each ring's own aspects, or isolate a single to-natal layer such as Transits to natal with one click.
How is the orb set?
The ceiling runs from 1° to 8° in half-degree steps and starts at 3.5°. Your chart settings still decide which aspects exist and at what orbs; the Multi-Wheel ceiling can only narrow that set. A progressed or directed point conjunct its own natal place is excluded as an artifact of the technique, while for transits and returns that conjunction is kept as a contact.
What happens if a ring fails to calculate?
The ring is marked as pending, incomplete or failed, with a Try again button. Astrolium does not draw a substitute. The Synthesise button stays unavailable until every selected ring is ready, so an AI reading is never built on a missing layer.

Get Every layer of time, on one wheel. as part of Astrolium

One subscription covers every feature. 5 free client profiles, no card required.